We strongly recommend the sensor is installed and allocated to a container via the platform or app before following this guide. For instructions on adding a container please refer to the following articles:
Platform: Add a Container to the Map Using the Web Platform
App: Add a Container to the Map Using the Superfy App
Ensure that the sensor is installed correctly, with the ultrasonic horns (Superfy Mini) or optical lasers (Superfy pro) facing downward toward the center of the bottom of the container. For optimal accuracy, it is recommended to use a laser measuring tool to verify correct alignment during installation.
We recommend using a laser sensor (Superfy Pro) in any container that does not meet the following ultrasonic sensor requirements:
When the Superfy Mini is deployed in waste bin mode, the device must be placed in the center of the waste bin. The container must meet minimum dimension requirements based on the ratio of height to diameter:
- The diameter should be at least 55% of the container height
- Example: A container with a height of 88 cm requires a minimum diameter of 48 cm
If your container has a smaller diameter relative to its height, or has an irregular shape that prevents center placement, a laser sensor (Superfy Pro) is recommended for more accurate fill level monitoring.
1. Install the sensor in the bin.
Step 1: Install and Wake the Sensor
Note: Please refer to the following installation guides for detailed installation instructions.
2. Trigger a manual reading to send a new data point to the platform.
3. Wait for the sensor to send the new reading.
To trigger a manual reading, please follow these steps:
Superfy Pro: Hold a strong magnet at either of the activation ports until you hear 1 beep. Remove the magnet and you will immediately hear an up-tone sound. After a few minutes, you will hear a second up-tone sound, indicating that the data has been successfully sent to the platform.
Superfy Mini: Using the Toolbox App, turn the device off and back on again to trigger a reporting interval. After a few minutes, the sensor will send the new reading to the platform.
Step 2: Check the Fill Level in the App1. Open the app and locate the container on the map.
2. Tap the container and select View.
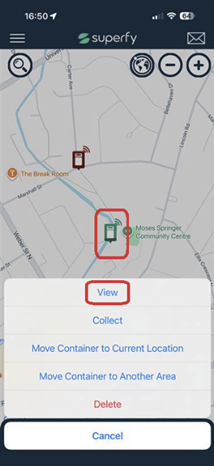
3. Check the Fill Level (%) shown in the data view.
4. Compare this value with what you can physically see inside the bin.Step 3: Decide if an Adjustment is Needed
If the fill level shown in the app matches what you see in real life, no changes are needed.
If the fill level does not match, continue to Step 4.
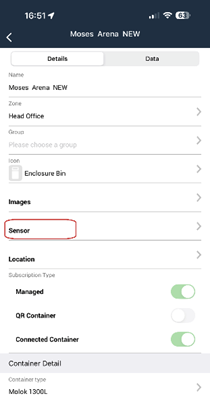
Step 4: Navigate to the Sensor Settings
1. Go to the container Details page.
2. Tap Sensor.

3. Tap the three dots (⋯) next to the sensor.
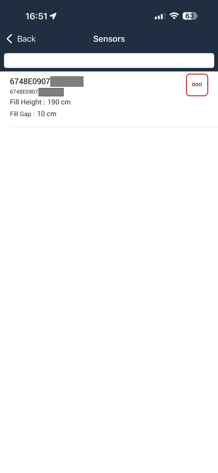
4. Select Change Value.

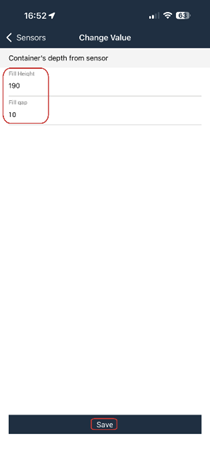
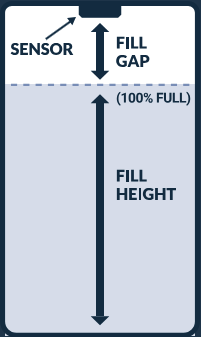
Step 5: Adjust Fill Height and Fill Gap
Fill Height is the distance from the bottom of the container to the point where the bin should be considered 100% full. This is the usable height of the container for waste.
- If the fill level shown in the app is lower than what you see in real life, decrease the fill height.
- If the fill level shown in the app is higher than what you see in real life, increase the fill height.
Fill Gap defines a safety buffer between the waste and the sensor when the bin is considered full. This is important to prevent waste from getting too close to the sensor and to avoid false readings or contamination of the sensor over time. Adjust the fill gap if the bin is being marked as full too late or if waste is getting too close to the sensor.
Once finished, tap Save.
Understanding the Fill Level Calculation
The fill level percentage is calculated using the following formula:
Fill Level = 100 * (fill height - READING + fill gap) / fill height
Example Calculation:
- Fill Height = 120 cm
- Fill Gap = 20 cm
- Sensor Reading = 75 cm (distance from sensor to waste)
Fill Level = 100 * (120 - 75 + 20) / 120
Fill Level = 100 * 65 / 120
Fill Level = 54.2%In this example, the bin is reported as 54.2% full. The sensor detected the waste 75 cm away. Since the total distance from the sensor to the bottom of the bin is 140 cm (120 cm fill height + 20 cm fill gap), this means there is 65 cm of waste in the bin (140 cm - 75 cm), which is 54.2% of the 120 cm fill height.
Step 6: Verify the Changes
1. Trigger a new manual reading to force the sensor to send updated data.
2. Check the updated fill level in the app.
3. Confirm that the reported fill level now matches what you see inside the bin and that there is still a safe distance to the sensor.
If needed, repeat the adjustment using small changes until the reading is accurate.