![superfy Logo-Neg-4.png]](https://knowledge.superfy.com/hs-fs/hubfs/superfy%20Logo-Neg-4.png?height=30&name=superfy%20Logo-Neg-4.png)
In this article
- Overview
- Get to know the dashcam
- Part 1: Before you install
- Part 2: Install the dashcam
- Part 3: Check it’s working
- LED reference
- Troubleshooting
Overview
The Superfy Drive Dashcam is a 4G dash camera with built-in vehicle tracking. It records the road ahead in Full HD, sends its location and video to Superfy over the mobile network, and can raise alerts for events like harsh braking or a panic button press.
You can add a second camera for a view of the cab or the cargo area, and optional AI features for driver monitoring (DMS) and driver assistance (ADAS).
This article covers the full installation, how to check the dashcam is working, and how to fix common problems.
| Part | What you do |
|---|---|
| Part 1: Before you install | Check the SD card, insert the SIM and SD card, and plan where everything goes |
| Part 2: Install the dashcam | Mount the dashcam, route and connect the cable, and fit the optional second camera |
| Part 3: Check it’s working | Check the lights and confirm the dashcam is reporting in Superfy |
| Troubleshooting | Fix common problems, using the lights to work out what’s wrong |
There are two ways to power the dashcam: plugging into the vehicle’s OBD2 port with the optional OBD2 power cable, or wiring it into the fuse box. The OBD2 cable is quicker and needs no wiring.
Important: wiring the dashcam into a vehicle’s fuse box should only be done by someone who is confident working with vehicle electrics. Incorrect wiring can damage the vehicle or cause a fire.
What’s in the box
- Superfy Drive Dashcam
- Power cable (4 m)
- Adhesive pads (x2)
- Torx screws (x4)
- Warranty card
Optional extras: OBD2 power cable, interior, cargo or rear camera and DMS (driver monitoring).
What else you need
- A microSD card, if one wasn’t supplied (see Step 1)
- A small Torx screwdriver, to open the card cover
- A hex driver, to tighten the camera angle
- A trim or pry tool, to tuck the cable behind the trim
- A fuse tap kit and basic wiring tools, if you’re wiring into the fuse box
- A cloth and glass cleaner
Key specifications
| Specification | Value |
|---|---|
| Power input | 8–32V DC (12V and 24V vehicles) |
| Operating temperature | -20°C to +70°C |
| Front camera | Full HD (1920 × 1080), over 140° field of view |
| Storage | microSD card, up to 128 GB (FAT32) |
| Network | 4G LTE Cat 6, nano SIM |
| Location | GNSS (GPS), accurate to within 3 m |
| Other connections | Wi-Fi, Bluetooth Low Energy, 1 x RS232, 1 x digital input, 1 x digital output |
| Size and weight | 120 × 60 × 70 mm with the bracket, 220 g |
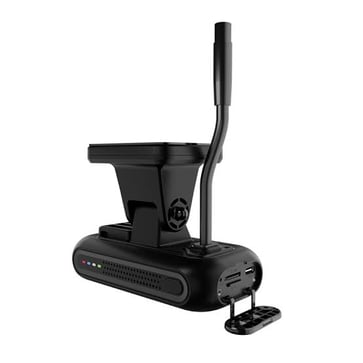
Get to know the dashcam

On the back of the dashcam (the side facing the driver) are:
- Multi-function button: press it to raise a panic alert. Double-press it to turn the dashcam’s Wi-Fi hotspot on or off.
- Four lights: these show the power, GPS, recording and mobile network status. See LED reference.
- Microphone and speaker: for cab audio and spoken alerts.
On the side, under a cover held in with Torx screws, are:
- Nano SIM slot
- microSD card slot
- USB-C port, used for setup and diagnostics
- Reboot button, a small hole you press with a pin
Part 1: Before you install
Step 1: Check the SD card
The dashcam records video to a microSD card. A slow or worn-out card is the most common cause of recording problems, so check the card before you fit it.
The card must be:
- microSD, formatted as FAT32
- Class 10 / U1 / V10 or faster. Slower cards won’t record properly.
We recommend a U3 / V30 card of 64 GB or more, ideally a high-endurance card made for dashcams.
| Card size | Approximate recording time |
|---|---|
| 64 GB | About 11 hours |
| 128 GB | About 22 hours |
When the card is full, the dashcam records over the oldest footage first.
Step 2: Insert the SIM and SD card
- Make sure the dashcam is unplugged.
- Undo the Torx screws on the cover and remove it.
- Slide the nano SIM into the SIM slot, using the metal tray to seat it correctly.
- Insert the microSD card with the metal contacts facing into the slot, until it clicks.
- Refit the cover and screws. The cover protects the cards from being removed.
Step 3: Plan the installation
Before you start, decide:
- Where the dashcam goes. Behind the rear-view mirror is best. It’s out of the driver’s line of sight and gets a clear view of the road. Make sure it’s within the area the windscreen wipers clear.
- How you’ll power it. Either plug it into the vehicle’s OBD2 port with the optional OBD2 power cable, or wire it into the fuse box (Step 6). The OBD2 port is usually under the dashboard on the driver’s side, near the steering column.
- Where the second camera goes, if you’re fitting one (Step 7).
- How the cable will reach the fuse box, usually along the top of the windscreen, down the A-pillar and under the dashboard.
Part 2: Install the dashcam
Step 4: Mount the dashcam
- Clean the inside of the windscreen behind the rear-view mirror, and let it dry.
- Hold the dashcam in position to check it doesn’t block the driver’s view.
- Peel the backing off the adhesive pad on the bracket and press the dashcam onto the windscreen.
- Press the bracket firmly against the glass for 3 to 5 minutes so the adhesive bonds.
Tip: if the adhesive pad has been used before or has lost its stickiness, replace it with a new one. A spare is included in the box.
Step 5: Route the cable
- Plug the main connector on the power cable into the dashcam.
- Use a trim tool to gently lift the edge of the headliner and windscreen trim, and tuck the cable in along the top of the windscreen.
- Run the cable down the A-pillar trim to the dashboard, then under the dashboard to the fuse box.
Keep the cable away from airbags, pedals and the steering column, and don’t leave loose cable where the driver could catch it.
Step 6: Connect the power
The power cable has three wires for power. Connect them as follows:
| Wire | Connect to |
|---|---|
| Red (Battery+) | A permanent 12V or 24V supply in the fuse box, one that’s live even when the ignition is off |
| White (ACC / ignition) | An ignition supply in the fuse box, one that’s only live when the ignition is on |
| Black (Ground) | A good ground point on the vehicle’s metal chassis |
Use a fuse tap to connect to the fuse box, rather than cutting into the vehicle’s wiring.
The red and white wires must go to different types of supply. The white wire tells the dashcam when the ignition is on or off, and the red wire powers it. If they’re swapped or both on the same supply, the dashcam won’t know when the vehicle is running.
The power cable has other wires, for optional accessories:
| Wire | Used for |
|---|---|
| Blue/White and Blue/Black | RS232 connection for accessories |
| Yellow/White | Digital output |
| Grey | Digital input, for example a panic button or door sensor |
| Camera connector | The optional second camera (Step 7) |
If you’re not using them, insulate the ends of any unused wires and tuck them away.
Important: the location of the permanent and ignition supplies varies by vehicle make and model. Check the vehicle’s fuse box diagram. Incorrect wiring can cause a fire.
Step 7: Fit the second camera (optional)
If you have an interior, cargo, rear or DMS camera:
-
Choose its position:
- Interior camera: high on the windscreen or headliner, where it can see the whole cab.
-
Cargo camera: inside the cargo area, looking over the load.
-
DMS (driver monitoring) camera: on or under the dashboard, facing the driver, 50 to 90 cm from the driver’s face. It must not block the driver’s view or get in the way of the steering wheel.
- Rear camera: mounted on the back of the vehicle, with a clear view to the rear.
- Clean the surface, peel the backing off the adhesive pad and press the camera into place.
- Plug the camera’s cable into the camera connector on the power cable.
Step 8: Aim the camera
-
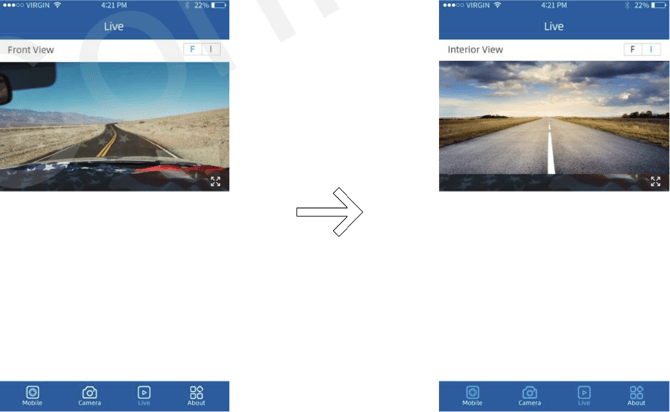
Use the QuCam+ app on your phone to see what the camera sees while you aim it. The app connects straight to the dashcam over its own Wi-Fi, so you don’t need mobile signal or a Superfy login.
Connect the QuCam+ app
- Download QuCam+ from the App Store (iPhone) or Google Play (Android).
- Turn on the vehicle’s ignition and wait 30 to 60 seconds for the dashcam to start.
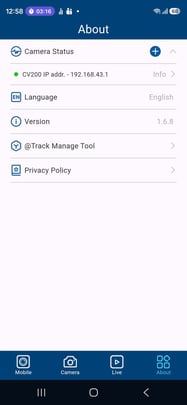
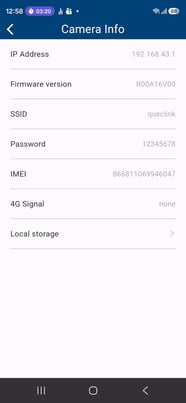
- Turn on the dashcam’s Wi-Fi hotspot. It turns on by itself when the dashcam starts, but turns off again if nothing connects within 5 minutes. If it’s off, double-press the multi-function button on the back of the dashcam. You’ll hear “Enable WiFi”.
- On your phone, open Settings > Wi-Fi and connect to the dashcam’s Wi-Fi network:
- Network name: queclink
- Password: 12345678
- If your phone says the network has no internet, choose to stay connected.
- Open QuCam+ and go to the Live tab. You’ll see the view from the camera.
Aim the front camera
- Loosen the bracket so you can tilt the camera.
- Watching the Live view, angle the camera so the road ahead fills the picture, with about 30% of the bonnet visible at the bottom.
- Remove the protective film from the lens.
- Tighten the bracket with a hex driver so the angle can’t move.
- Check the Live view again to make sure the angle didn’t move while you tightened it.
- Download QuCam+ from the App Store (iPhone) or Google Play (Android).

This process can be repeated for both cameras, if a second one is installed.
Part 3: Check it’s working
Step 9: Check the lights
-
Turn on the vehicle’s ignition.
-
Wait 30 to 60 seconds for the dashcam to start up.
-
Check the four lights on the back of the dashcam.
When everything is working, all four lights are on solid: red (power), blue (GPS), white (recording) and green (mobile network).
The GPS light can take a few minutes to go solid the first time, especially if the vehicle is inside or under cover. Move the vehicle outside if it keeps blinking.
If any light is off or blinking, see LED reference and Troubleshooting.
Step 10: Check the dashcam in Superfy
Once the dashcam is reporting in Superfy, the installation is complete.
LED reference
The dashcam has four lights. Each one can be solid, off, blinking quickly, or blinking slowly.
| Light | On solid | Off | Blinking quickly | Blinking slowly |
|---|---|---|---|---|
| Red (power) | Powered on, or asleep | No power | Updating firmware. Don’t turn off the power. | Low supply voltage |
| Blue (GPS) | GPS working | Not used | Finding a GPS signal | GPS problem |
| White (recording) | Recording | Not recording | Recording an event | Recording problem |
| Green (mobile network) | Connected to the network | Not used | Connecting to the network | Network problem |
Other things you might see:
- All lights go off and come back on, then a beep: the dashcam is restarting.
- The white light goes off, then comes back on: the SD card is being formatted.
Troubleshooting
Start with the lights
Most problems show up on the dashcam’s lights. Check them first, then find the matching problem below.
| What you see | Most likely cause | Go to |
|---|---|---|
| No lights at all | No power | No lights |
| Red light blinking slowly | Low voltage | Low voltage |
| Red light blinking quickly | Firmware update | Firmware update |
| Blue light blinking for more than a few minutes | No GPS signal | GPS problems |
| White light off or blinking slowly | SD card problem | Recording problems |
| Green light blinking for more than a few minutes | No mobile signal or SIM problem | Network problems |
No lights
- Check the main connector is pushed fully into the dashcam.
- Turn on the ignition. If the white (ignition) wire is connected correctly, the dashcam starts within 30 to 60 seconds.
- Check the fuses you tapped into, and the fuse in the fuse tap, haven’t blown.
-
Check the red wire has 8–32V and the black wire is on a good ground. A loose or painted ground point is a common cause.
Low voltage
The red light blinks slowly when the supply voltage is low.
- Check the vehicle battery. A weak battery, or a vehicle that’s been parked for a long time, can trigger this.
- Check the red wire is on a permanent supply and the ground connection is clean and tight.
Firmware update
The red light blinks quickly while the dashcam updates its firmware. This can take 5 minutes or more.
Don’t turn off the ignition or unplug the dashcam during an update. Wait for the red light to go solid.
GPS problems
- Blue light blinking quickly: the dashcam is still finding a GPS signal. Move the vehicle outside, away from tall buildings, and wait a few minutes.
- Blue light blinking slowly: there’s a GPS problem. Check the dashcam is mounted on the windscreen with a clear view of the sky, and isn’t behind a metallic or heated windscreen area. Restart the dashcam (see Restart the dashcam).
Recording problems
The white light shows the recording status. If it’s off or blinking slowly, the dashcam isn’t recording properly. This is almost always the SD card.
- Check an SD card is fitted (Step 2).
- Check the card meets the requirements in Step 1. Slow cards (below Class 10 / U1) can’t keep up with the video.
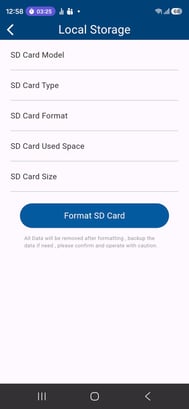
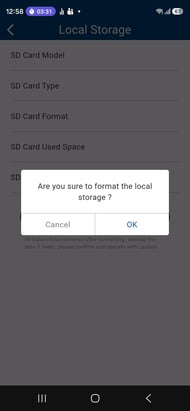
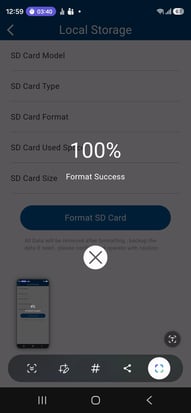
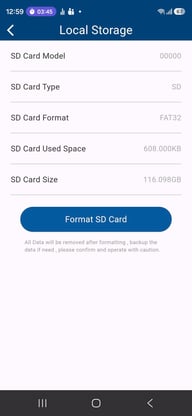
- Format the card. The card can be formatted using the QuCam+ app.
- If the problem continues, replace the card. SD cards wear out with constant recording.
Video missing after an event? Event videos are saved while the dashcam is recording. If the white light was off at the time, there won’t be any footage.
Network problems
-
Green light blinking quickly: the dashcam is connecting to the mobile network. Wait a few minutes, especially after a first install or in a new area.
-
Green light blinking slowly: there’s a network problem.
-
Check the vehicle is somewhere with mobile coverage.
-
Check the SIM is fitted correctly (Step 2).
-
Check with Superfy that the SIM is active.
-
While the dashcam is offline, it keeps recording to the SD card.
Dashcam doesn’t turn on or off with the ignition
The white wire tells the dashcam when the ignition is on.
- Dashcam never turns off: the white wire is probably on a permanent supply. Move it to an ignition supply.
- Dashcam doesn’t start with the ignition: the white wire may be on a supply that isn’t live, or the red and white wires may be swapped. Check them against the table in Step 6.
After the ignition is turned off, the dashcam goes to sleep after 3 to 5 minutes.
Dashcam is falling off the windscreen
The adhesive pad isn’t bonded properly. Remove it, clean the glass and the bracket, fit a new adhesive pad and press it on firmly for 3 to 5 minutes. Avoid fitting it in very cold or damp conditions if you can.
Picture is blurry or the angle is wrong
- Check the protective cover has been removed from the lens.
- Clean the lens and the windscreen in front of it.
- Re-aim the camera so about 30% of the bonnet is visible (Step 8), then tighten the bracket.
Restart the dashcam
If the dashcam stops responding:
- Remove the side cover.
- Press the reboot button with a pin.
- Wait for all the lights to go off and come back on, then a beep.
You can also turn the ignition off and on again.