If you have containers that do not require frequent monitoring, such as large bins or containers that only require collections on a scheduled service, the Managed Assets feature is a valuable tool to use within the platform. Additionally, you may want to utilise this feature for administrative and container management purposes, allowing you to store and record all of your containers in one centralized platform.
STEP 1: ADD ASSET TYPE
- Log into your Superfy Account.
Upon logging into the platform, you will be automatically taken to the Collections module. Otherwise, navigate to the Collections module located on the top left-hand side of the screen.

- Click on the Settings icon located on the top right-hand side of the screen.
- Select Inventory from the listed menu.

- On the Inventory pop-up screen, click on Add Asset Type and enter the required information below

-
- Asset Type Name - must be named Managed Asset as it is a necessary requirement for this feature to function correctly.
- Capacity - this is the measurement of the container volume/capacity, which is typically included in the bin specification manual provided by the container manufacturer.
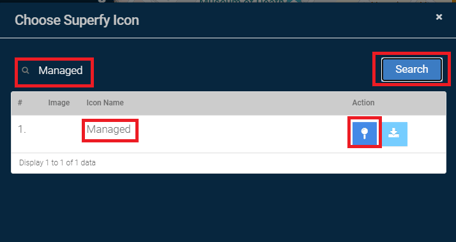
- Icons - click on Use Superfy Icons and search for Managed and click on the Pin Icon to select the icon.
-
- Description - add a brief description of the container type.
- Fill Height - this is not required as no sensor associated to the container.
- Fill Gap - this is not required as no sensor is associated to the container.
- Asset Tags - this is optional - add asset tags unique to the Managed Assets (e.g., bin type, name etc..). This is specifically useful for further filtering and container management purposes.
- Asset Type Image - click here to add image of the container.

- Click Save
STEP 2: ADD PIN TO THE MAP
- Search and zoom in on the Location on the map where you want to add the container.
You also have the option to utilise the Search Bar ![]() icon on the top right-hand side of the Map View to search for the exact address.
icon on the top right-hand side of the Map View to search for the exact address.

- Click on the Place Asset on Map icon, which can be found on the right-hand side panel of the map view.

- Drop the Pin on your desired location
On the Add Asset to Map pop-up screen, enter the below information:
-
-
- Zone - select your preferred Zone that you would like to add the container to.
- Group - if you wanted to further filter your zones, add to a group.
-
Click Here to learn more about Groups.
-
-
- Asset Type - select Managed Assets.
- Waste Type - select your waste type, e.g., e-waste, glass metal.
- Sensor - this is not required as no sensor will be associated to the container.
- Fill Height - this is not required as no sensor is associated to the container.
- Fill Gap - this is not required as no sensor is associated to the container.
- Name - use your preferred naming convention.
-

- Once you click Save, the container will be displayed on the map in Green and the icon will appear different to the other containers you have on the map. This is to help you easily identify the Managed Assets on the map.

- Click on the Asset and click on Container Details on the Managed Asset pop-screen located on the right-hand side of the screen.

- Scroll down to the Colour Changing Threshold (in days) section and specify the number of days that you would like the container to change colour to Red. Green icon indicates the collection threshold has not been met. Once met, the icon will change to Red indicating a collection is required.
Remember, there is no sensor, so the actual fullness level is not known. The colour change is based on days only.

- Click Save
Once the Container changes to Red, you can add it to a route ready for collection and once the container has had an Actual Collection (not Assumed Collection), then the pin will change back to Green and the threshold count will start again.
An Actual Collection means that the operator has explicitly informed the system that an Container has been collected by using the Routing feature. An Assumed Collection is based on your preference selected (usually Half Fill Level Configuration).
