- Connected Container - these containers have some sort of sensor installed that gives data such fill level, location etc. You can customize the frequency at which the sensor captures the fullness reading from the container and sends this data to the platform.
- QR Container - these containers are equipped with QR Codes, allowing Collections Operators to easily scan the code for confirming collections. Additionally, the public can also scan the code to request collections, making the collection process more efficient and accessible for all involved parties. These containers do not display fullness level data either.
- Managed Container - these containers do not have a QR code or sensor assigned to them. They can have a collection threshold rules associated with them and are particularly beneficial for containers that do not need frequent collections. These containers do not display fullness level data; instead, they change color to Green, Orange, or Red based on the set collections threshold countdown.
- QR and Connected Container - the best of both worlds, you can assign a QR Code to a container and also have a sensor installed in the container.
How to add a Container
To facilitate a seamless installation process, it is essential for customers to complete the Container Information Template and submit it to their Account Manager or Customer Success Manager. This important step enables our Customer Success team to add the containers to their designated location on the map prior to the installation of the Fill Level Sensor or Smart Container.
Alternatively, the installation technician(s) has the option to utilise the Superfy App to complete this process while on-site.
Ensuring that the containers are placed in their designated locations on the map is crucial for a smooth installation process. This step allows the installation technician(s) to verify that the Fill Level Sensors are turned on, assigned to the appropriate containers, and recording accurate fill level data. It also helps in proactively troubleshooting any issues while on-site.
We recommend enabling Location Sharing on your web browser to allow the platform to automatically detect your current location.
- Log into your Superfy Account
Upon logging into the platform, you will be automatically taken to the Collections module. Otherwise, navigate to the Collections module located on the top left-hand side of the screen.

- Click on the Search (
 ) icon located on the top right-hand side of the Map View.
 - Select the Street/Location option from the drop-down menu to find the specific Address where you would like to add the container. This will automatically center the map to that specific location.

Utilise your Mouse or Touchpad to zoom in or out on the map as needed to get a closer or broader view of the area. Alternatively, you can also utilise the Zoom In and Zoom Out (![]() ) feature located in the top-right-hand panel of the screen.
) feature located in the top-right-hand panel of the screen.
- Click on the Place Container on the Map icon, located on the right-hand side panel of the Map View.

- Drop the Container (
 ) on your desired location.
An Add Container to Map pop-up screen will load. Please fill in the required Container information.
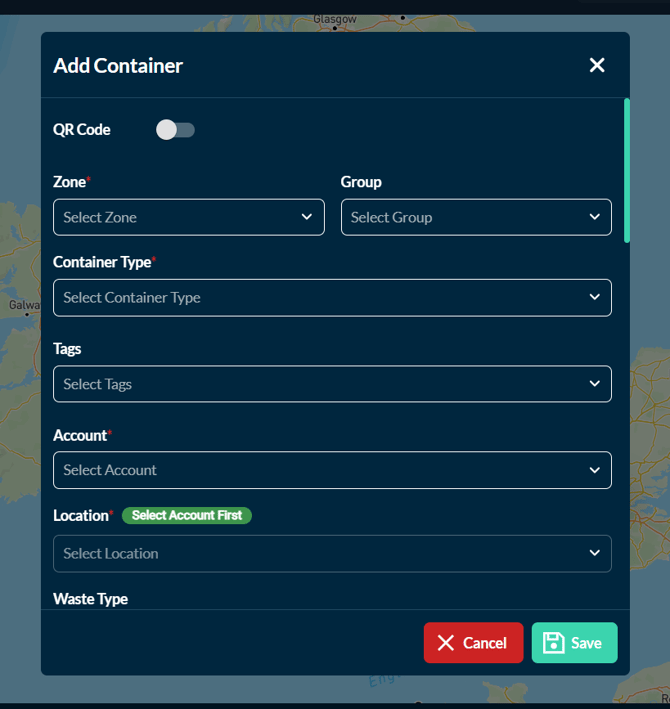
Please note that the QR Code feature is a paid subscription. Enabling it will incur an additional charge.
-
-
- QR Code - Please enable this feature only if you have a paid subscription.
-
-
-
- Container Type - e.g., organic container, battery and vape container etc...
- Container Tag - this is optional. You can add any additional tags of your choice to a container. This is mostly useful for additional filtering purposes on the platform.
- Account - select the appropriate account associated with the container
- Location - select the appropriate location associated with the container
-
To assign an Account and Location to a container, you must first create them in the CRM menu.
-
-
- Waste Type - select the appropriate waste material
-
-
-
- Device - search and select the Sensor Serial Number that you would like to allocate to the container.
-
If you choose to allocate a sensor, it's crucial to:
- Ensure that the G2 Fill Level sensor is allocated to the container first before it is Powered On. Failure to do so will cause a delay in data transmission, as the sensor must wait for the next heartbeat before it can connect.
- When the sensor is activated, the container icon will change color within a few minutes from Grey (
 ) to one of the following, depending on the fullness level or the applied Intermediate or Max Threshold.

- Take a Manual Reading after the container is added to the map to ensure a heartbeat is being sent from the sensor to the platform (confirm date and timestamp matches) and verify that the container fullness level matches what is physically in the container.
-
-
- Name - use your preferred name for the container (i.e. Container Identification Number)
- Fill Height - add the container Fill Height here in cm
- Fill Gap - add the container Fill Gap here in cm
-
The Fill Height and Fill Gap fields will appear only when a sensor is selected.
-
-
- Click Save
-
-
A clear picture of the container type
-
A clear pictures of where the sensor(s) was installed in the containers (especially if they are installed slightly different to one another)
-
A clear picture of environment of where the container is situated.
During on-site installation, the installation technician(s) have the capability to take and upload pictures of each container using the Superfy Mobile Application while adding it to the platform. Alternatively, you also have the option to take and add them at a later date on the platform if required.
Drivers can also use the Superfy Mobile Application to take photos of containers and attach them for reporting purposes, allowing their managers to review them. This includes documenting any damages to a container or confirming its delivery to the designated location, among other uses.